All Calligraphy Letters A to Z

So, you want to be a modern calligraphy artist. But it’s hard, right?! This stuff takes some real patience, not to mention learning a whole new alphabet. This guide is here to help you learn the complete set of calligraphy letters A to Z and to provide a reference to turn back to when you lose your way. We’ll cover…
Let’s dive right in.
Tap to jump to a specific letter:
Start Learning Right Now with Lettering Leap™
A guided course that teaches you hand-lettering in just 30 days
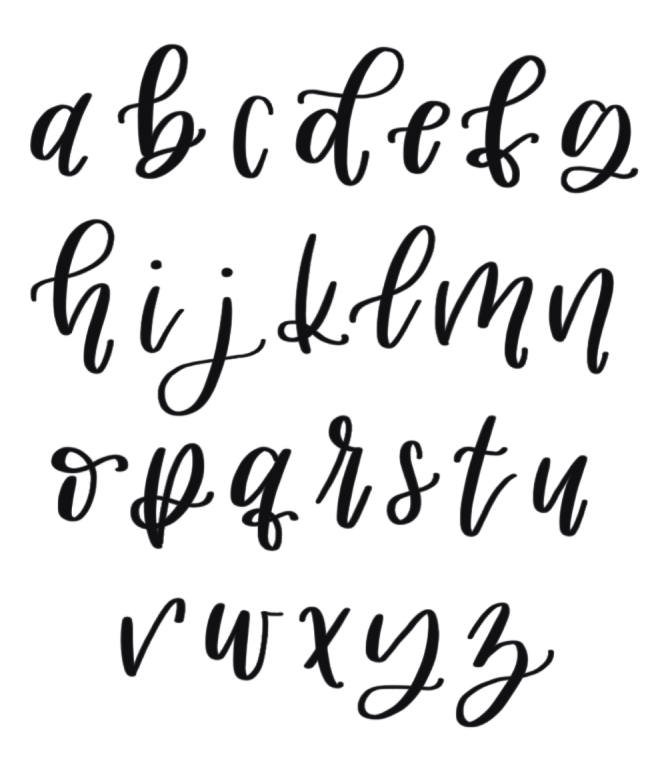
The (Modern) Calligraphy Alphabet
The modern calligraphy alphabet is made up the 26 letters of the alphabet, A through Z. It relies on the thick-to-thin principle (more on this in a moment), varying the weight of each stroke to create a more stylized font.
Here is the complete modern calligraphy alphabet:
Modern vs. Traditional Calligraphy Letters
If you’re new to hand-lettering, you may not realize that modern calligraphy letters are different than traditional. Traditional calligraphy is overall more rigid, cleaner, cut-and-dry. It also employs the use of a traditional calligraphy fountain pen and ink well.
Modern calligraphy letters, on the other hand, can take many different forms. In fact, the alphabet above is just one of many forms of modern calligraphy, but the most common is the thick-to-thin-stroked set of letters above, also known as brush lettering.
That’s what we’ll be learning here.
Uppercase & Lowercase Similarities & Distinctives
Just like in regular print handwriting and cursive, modern calligraphy letters come in uppercase and lowercase variations. For each letter (A, B, C, etc.) there is an uppercase version (A, B, C, etc.) that’s unique from the lowercase version (a, b, c, etc.).
These unique variations will be explained in greater detail later on. For now, it’s important to remember that both will use the thick-to-thin principle, and both can be broken down into eight basic strokes. We’ll get into these shortly.
A few important differences to keep in mind between uppercase letters and lowercase are the height differences. As you might guess, uppercase or capital letters generally reach the capital height or cap line. Lowercase letters, at least the bulk of their composition only reaches to X-height or midline.
Understanding the Thick-to-Thin Principle
At the heart of modern calligraphy letters is the thick-to-thin principle. This is a guideline that literally shapes the letters of the calligraphy alphabet, giving them the unique style and character that turns them into recognizable art.
The thick-to-thin principle states that downstrokes are thick and upstrokes are thin.
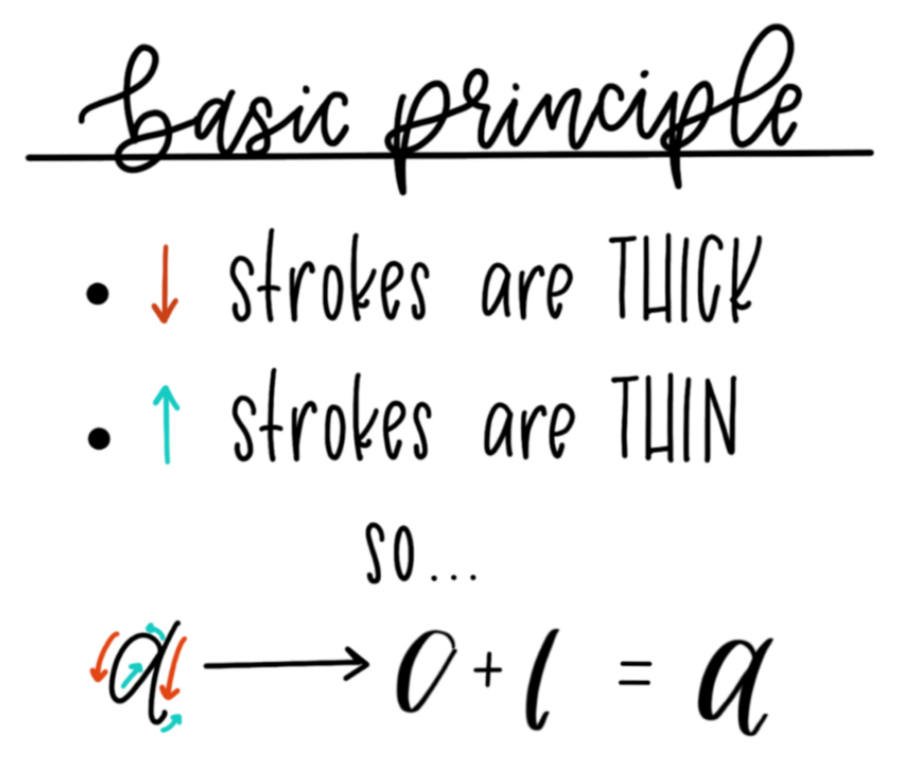
Now, to properly understand this principle, you have to understand how a calligraphy pen works (physical or digital). This tip of a calligraphy pen is not like your average ballpoint. It is more like a hybrid between a fine-tip paint brush and a marker. The long, pointed tip is flexible, allowing it to bend in proportion to the pressure the lettering artist applies.
In other words, more pressure = more bend = thicker stoke. Less pressure = less bend (straighter) = thinner stroke.
Two Basic Strokes vs. Eight
But wait, didn’t we say there are eight basic calligraphy strokes, not just two?!
True enough. As stated earlier, there are in fact eight basic strokes that make up all calligraphy letters from A to Z. But even these eight strokes can be broken down into just two primary elements: up or down. When the stroke is traveling in the upward direction, the line is thin; that is, less pressure on your calligraphy pen. When the stroke is moving in the downward direction, the line is thick – more pressure on the pen.
“What about sideways strokes?” you might ask. Great question!
If you stop to look carefully at the modern calligraphy alphabet, you will find that very few, if any, strokes move perfectly sideways. Calligraphy letters are full of bounces, movement, curves and flourishes. Rarely do you find a perfectly horizontal line. There is always some upward or downward pitch. And even if a line does have a near-horizonal orientation, it is always brief and part of some transition from up or down.
When you begin to dive into your own hand-lettering exercises and you’re not sure if the line should be thick or thin, pause and identify if the line is moving upward – even slightly! – or downward. Is it getting closer to the capital height or closer to the baseline? Then, apply pressure and thickness accordingly. If you come to a “horizontal” stroke, simply let the horizontal stroke mimic whichever thickness the stroke before it had.
8 Basic Strokes of Calligraphy Letters
It’s high time we delved into the eight basic strokes that make up all calligraphy letters, A through Z. It’s important to keep these eight companions close by and commit them to memory, because when we get into the step-by-step guide for each letter, we’ll be leaning on them heavily.
The eight basic calligraphy strokes are defined below.

Upstroke - A thin stroke that only progresses toward the capital height; that is, upward, without any shift to downward movement
Downstroke - A thick stroke that only progresses toward the baseline; that is, downward, without any shift to upward movement
Overturn - A “hill-like” stroke that begins as a thin line in upward progression, but shifts into downward progression, becoming a thick line
Underturn - A “valley-like” stroke that begins as a thick line in downward progression, but shifts into upward progression, becoming a thin line
Ascending loop - A curling stroke that wraps around on itself, beginning with a thin, upward-progressing line but shifting to thick as it wraps around and descends
Descending loop - A curling stroke that wraps around on itself, beginning with a thick, downward-progressing line but shifting to thin as it wraps around and ascends
Compound curve - A wavy stroke that shifts from thin to thick to thin again or vice versa as it progresses from left to right
Oval - A round stroke that shifts from thick to thin as it makes a complete counterclockwise circuit, ending at the same point at which it began
Typography Lines Explained
One last thing before we get into the specifics of writing each calligraphy letter A to Z – we need to talk about typography lines. You might think typography lines only apply to handwriting or traditional calligraphy, but they actually play an important role in modern calligraphy too.
Typography lines are the horizontal guidelines that dictate the positioning and overall height of your letters. Without them, your lettering can get jumbled up like a kindergartener’s piece of homework.
There are five key typography lines to remember for hand-lettered calligraphy:

Capital height – The top point of your capital letters and some lowercase letters with an extended reach
X-Height – The mid-point of your capital letters and typically the top of most lowercase letters, or at least the main portion of the letter
Baseline – The bottom line where all of your letters rest; the lowest point of the main portion of each letter
Ascender Line – An extended point above the capital height for letters with a particularly tall reach
Descender Line – An extended point below the baseline, defining where legs reach
Why Typography Lines Are Important in Calligraphy
Typography lines in modern calligraphy shouldn’t be viewed as exact, no-trespassing lines. They’re more flexible than that. However, it’s important to have the concept of them in your mind while lettering, because they will help give your art a more professional touch. They’re actually one of the secrets to mastering calligraphy letters.
The aim is continuity. Let’s take the baseline in the word calligraphy for example. Your baseline can veer, warp, bend or wobble. What it can’t do is break. You want the word to flow across the page, and if you don’t pay attention to your baseline, the first half of the word calli- may sit awkwardly higher than the second half -graphy.
It’s similar with the X-height and the capital height but to lesser degrees. Just remember to keep your typography lines in the back of your mind while lettering, and refer to the diagram above for help in the step-by-step below.
To learn more, check out our complete guide to typography lines in calligraphy!
Step-by-Step Calligraphy Letters
Using our basic thick-to-thin principle, the language of our eight basic strokes and the loose parameters of our typography lines, let’s walk through each calligraphy letter A to Z. If you’d like to skip to a particular letter, tap the menu below.
When you’re finished, check out all of our brush lettering resources to truly start building your skills.
Tap to jump to a specific letter:

Uppercase Calligraphy A
Upstroke + descending loop
Begin at the baseline and make a rightward upstroke to the capital height. Next, make a counterclockwise descending loop that reaches down to the descender line. Finish with a swirling flourish, trailing left.
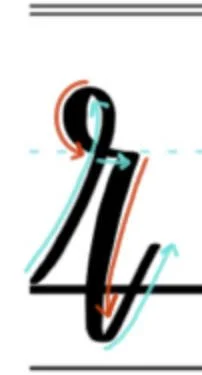
Lowercase Calligraphy a
Oval + underturn
Begin at the X-height and make an oval, the bottom of which touching the baseline. Next, make an underturn along the right side of the oval, starting high and finishing with a curve that dips below the baseline.

Uppercase Calligraphy B
Downstroke + ascending loop + descending loop
Begin with a downstroke from capital height (or slightly below it) to the baseline. Next, make an ascending loop that extends up to the capital height, loops clockwise, and comes back down to about midway between the baseline and X-height, stopping when it touches the vertical line. Then, make a slight overturn, but shift into a descending loop drops down to the descender line and curls around clockwise, finishing with a flourish on the right.

Lowercase Calligraphy b
Ascending loop + overturn + descending loop
Begin with a counterclockwise ascending loop that starts near the X-height, reaches up to the capital height and ends at the baseline. Next, make a slight overturn, but shift into a descending loop with a trailing tail off to the right.

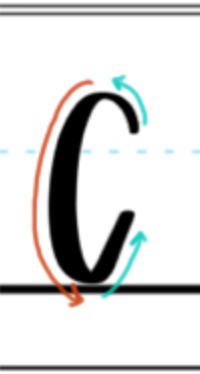
Uppercase Calligraphy C
Oval (open)
Make a counterclockwise oval, starting just below the capital height and reaching down to the baseline. Leave the oval open, ending just before the X-height.
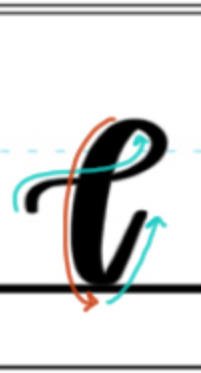
Lowercase Calligraphy c
Oval (open)
Make a counterclockwise oval that begins just above the X-height and reaches down to the baseline. Leave the oval open, ending about halfway up to the X-height.

Uppercase Calligraphy D
Downstroke + overturn + descending loop
Make a downstroke, starting at the capital height and reaching down to the baseline. Next, make an overturn that veers to the right, reaching all the way back up to the capital height and down again. Finally, shift into a descending loop that curls clockwise, dips down about halfway between the baseline and descender line, and wraps around with an upward flourish to the right.
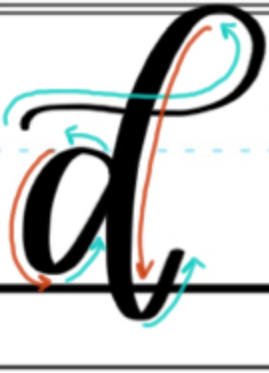
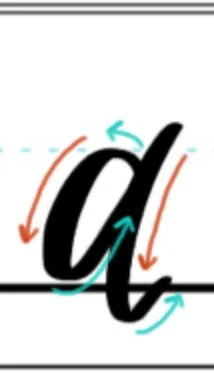
Lowercase Calligraphy d
Oval + ascending loop
Begin at the X-height and make a counterclockwise oval. Begin the second stroke with a flourish, starting at the far left, just above the X-height. Shift into an ascending loop. Wrap the loop counterclockwise, touching the ascender line and dipping the bottom below the baseline. Finish with a slight upturn at the bottom.


Uppercase Calligraphy E
Oval (half) + oval (open)
Begin just below the capital height, making a half an oval that stops at the X-height. Next, make another counterclockwise oval but leave it open, touching the baseline and ending about halfway up to the X-height.
Lowercase Calligraphy e
Ascending loop
Begin below the X-height and make an ascending loop. Bring the stroke down to the baseline and finish with an upturn to the right.

Uppercase Calligraphy F
Downstroke + compound curve + compound curve
Start with a downstroke from capital height to baseline. Top the stroke with a shallow compound curve, and then a second, shorter compound curve below the X-height.

Lowercase Calligraphy f
Ascending loop + descending loop + compound curve
Begin at the far left, making an ascending loop through the X-height, up to the capital height and down below the baseline. Shift the stroke into a descending loop at the bottom, keeping the curves tight. Wrap counterclockwise, shifting again into a shallow compound curve.

Uppercase Calligraphy G
Oval (open) + compound curve
Make an open oval, starting just below the capital height and circling counterclockwise. Touch the baseline, and stop halfway up to the X-height. Finish with a shallow compound curve to top the open end of the oval.

Lowercase Calligraphy g
Oval + descending loop
Begin with an oval, starting at the X-height, wrapping counterclockwise, reaching down to the baseline and back up to the X-height. Shift to a descending loop that wraps clockwise and finishes with a flourish to the right.


Uppercase Calligraphy H
Descending loop + ascending loop
Begin at the capital height and make a descending loop that dips below the baseline. Bring the loop back up clockwise, and shift into an ascending loop that reach up to the capital height and comes all the way back down to the baseline. Conclude with an upturn at the bottom, to the right.

Lowercase Calligraphy h
Ascending loop + compound curve
Begin with an ascending loop that starts at the X-height, loops up to the capital height and drops back down to the baseline. Next, make a compound curve up to about the X-height, dropping down to the descender line, and coming back up to finish at the baseline.

Uppercase Calligraphy I
Underturn + ascending loop
Start at the X-height, and make a slight underturn to the left. Then, make a much large sweeping stroke rightward to begin an extravagant ascending loop. The stroke dips down to the baseline and all the way up to the capital height. Then the ascending loop curves counterclockwise and drops down to the descender line. End with a slight upturn to the right.
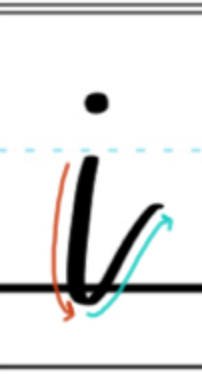
Lowercase Calligraphy i
Underturn + dot
Start at the X-height and make an underturn, dropping down to the baseline and back up, stopping halfway to the X-height. Place a dot above the original starting point.

Uppercase Calligraphy J
Descending loop + compound curve
Make a large descending loop, starting at the capital height, dropping down to the descender line and looping around clockwise. Finish with a very shallow compound curve about halfway between the baseline and X-height.
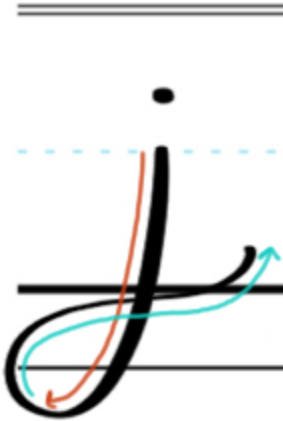
Lowercase Calligraphy j
Descending loop + dot
Starting at the X-height, make a clockwise descending loop that reaches down to the descender line. Looper around upward and to the right, finishing just above the baseline. Place a dot above the X-height starting point.
Uppercase Calligraphy K
Downstroke + descending loop
Make a downstroke from capital height to baseline. Begin the second stroke to the right, also at the capital height. Make a descending loop that curves around clockwise as it passes through the first stroke. Finish with a flourish that ends on the right side, about halfway between the baseline and capital height.

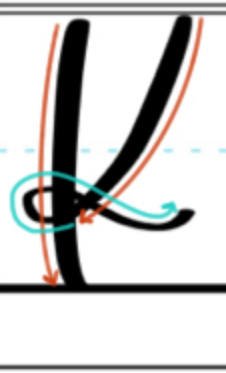
Lowercase Calligraphy k
Downstroke + descending loop
Make a downstroke from capital height to baseline. Make a second stroke, a descending loop, starting around the X-height and looping clockwise. Pass through the first stroke, and finish off to the right with a flourish, ending just above the baseline.

Uppercase Calligraphy L
Ascending loop + descending loop
Start at the X-height and make an ascending loop that reaches up to the capital height and circles around counterclockwise. Shift into a clockwise descending loop as you drop the stroke down to the baseline. End with a flourish that trails to the right.

Lowercase Calligraphy l
Ascending loop + underturn
Start halfway between the baseline and X-height. Make a tall ascending loop that reaches up to the capital height and curves counterclockwise. As you bring the stroke down to the baseline, shift to an underturn that curls off to the right.

Uppercase Calligraphy M
Downstroke + overturn + compound curve
Make a downstroke from capital height to baseline. Next, make a large overturn that reaches back up to the capital height and drops down below the X-height. Then, make a large compound curve, reaching up about halfway between the X-height and capital height, dipping below the baseline and finishing above the baseline once more.

Lowercase Calligraphy m
Downstroke + overturn + compound curve
Make a downstroke from X-height down to the baseline. Next, make an overturn that reaches above the X-height and back down about halfway between baseline and X-height. Finish with a compound curve that reaches up to the X-height and dips below the baseline, trailing rightward.


Uppercase Calligraphy N
Downstroke + compound curve
Make a downstroke from capital height to baseline. Next, make a large compound curve that reaches all the way up to the capital height once more, drops down to the baseline and curls up, trailing rightward.
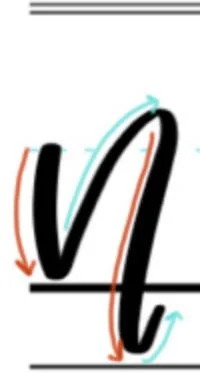
Lowercase Calligraphy n
Downstroke + compound curve
Start at the X-height and make a downstroke to the baseline. Then, make a compound curve that breaches the X-height and drops down again, almost to the descender line. Finish the stroke, trailing rightward and reaching toward the baseline.

Uppercase Calligraphy O
Oval + compound curve
Make an oval, starting about halfway between the X-height and the capital height. Rotate counterclockwise, touching the baseline and reaching up to the capital height. Leave the oval open, finishing with a compound curve that passes through the oval.

Lowercase Calligraphy o
Oval + compound curve
Make an oval, starting just below the X-height and rotating counterclockwise. Drop down to the baseline and curl back up above the X-height. Leave the oval open, and finish with a compound curve to crown the oval.

Uppercase Calligraphy P
Downstroke + ascending loop + compound curve
Make a downstroke from the capital height to the baseline. Next, make an ascending loop, rotating clockwise and reaching up to the capital height. Bring the loop back down below the X-height to pass through the first stroke. Continue to curl around clockwise, ending with a shallow compound curve that trails rightward.

Lowercase Calligraphy p
Downstroke + ascending loop + compound curve
Make a downstroke from X-height down to the descender line. Next, make an ascending loop that reaches up to the X-height and curls around clockwise, dipping below the baseline. Pass through the first stroke, continuing to curl clockwise. Finish with a shallow compound curve trailing off to the right.

Uppercase Calligraphy Q
Oval + compound curve
Make a large, clean oval that begins near the capital height, drops down to the baseline and finishes once more where it started. Next, make a compound curve that passes through both sides of the oval, starting at the X-height and finishing at the baseline.

Lowercase Calligraphy q
Oval + descending loop + compound curve
Make an oval, starting at the X-height, dropping down to the baseline and reaching again to the X-height. Next, make a descending loop that curls counterclockwise, down to the descender line. Continue to curl around, passing through the vertical leg of the stroke. Finish with a tight, shallow compound curve, just below the baseline.

Uppercase Calligraphy R
Downstroke + ascending loop + compound curve
Make a downstroke from capital height to baseline. Next, make an ascending loop with a large loop that reaches up the capital height once more. As you descend back down through the X-height, passing through the first stroke, wrap around and then shift into a compound curve. Curve around clockwise, and finish along the baseline, trailing to the right.
Lowercase Calligraphy r
Ascending loop + underturn
Make an ascending loop that starts at the baseline and reaches above the X-height, rotating counterclockwise. Next, make an underturn that dips below the baseline.

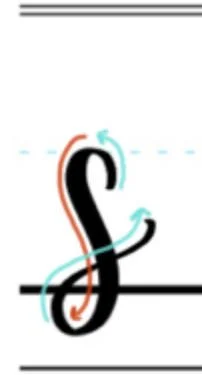
Uppercase Calligraphy S
Overturn + descending loop
Begin with a counterclockwise overturn stroke that starts about halfway between the X-height and capital height. Reach up to the ascender line and curve back down toward the baseline. Shift into a descending loop, wrapping clockwise this time and brushing the baseline. Continue to curve around, intersecting the vertical segment and ending with a flourish that trails to the right.
Lowercase Calligraphy s
Overturn + descending loop
Make a small overturn, starting just below the X-height and wrapping counterclockwise. Bring the stroke down, shifting into a descending loop. Dip below the baseline, and then loop back up clockwise to pass through the vertical line. End with a flourish on the right, about halfway back up to the X-height.

Uppercase Calligraphy T
Underturn + compound curve
Make a large underturn, starting at the capital height, reaching down to the baseline and climbing back up to the X-height. Finish with a very shallow compound curve across the top of the first stroke.

Lowercase Calligraphy t
Underturn + compound curve
Start about halfway between the X-height and the capital height. Make a large underturn, dropping down below the baseline and reaching back up, almost to the X-height. Finish with a shallow compound curve through the middle of the first stroke, at the X-height.

Uppercase Calligraphy U
Underturn + underturn
Make a large underturn, starting at the capital height, dropping down to the baseline and returning again to the capital height. Then, make a second underturn stroke, dropping down to the baseline and reaching up about halfway between the baseline and X-height.

Lowercase Calligraphy u
Underturn + underturn
Start with an underturn that begins at the X-height, touches down to the baseline and comes up again to the X-height. Make the second stroke, another underturn, dropping down below the baseline and ending just above it.

Uppercase Calligraphy V
Downstroke + upstroke + overturn
Make a downstroke from capital height to baseline. Next, make an upstroke up to the capital height, and finish with a small overturn at the top.

Lowercase Calligraphy v
Downstroke + upstroke + overturn
Make a downstroke from X-height to baseline. Next, make an upstroke back up to the X-height, and finish with a small overturn above the X-height.

Uppercase Calligraphy W
Underturn + underturn + underturn
Begin at the capital height and make a large underturn that dips down to the baseline and finishes at the X-height. Next, make a second underturn, dropping down below the baseline and back up to the capital height. Finish with a very small, shallow underturn at the top, trailing right.

Lowercase Calligraphy w
Underturn + underturn + underturn
Begin at the X-height and make an underturn that touches the baseline and comes back up, just below the X-height. Start a second underturn that drops below the baseline and comes back up, just below the X-height. Finish with a very small, shallow underturn at the top.

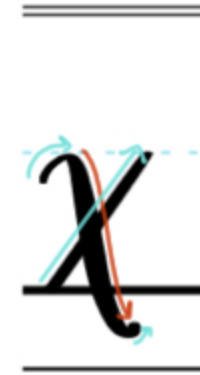
Uppercase Calligraphy X
Compound curve + upstroke
Make a compound curve, starting just below the capital height and dropping down below the baseline. Make a second stroke, an upstroke, that passes through the first, starting at the baseline and ending at the capital height.
Lowercase Calligraphy x
Compound curve + upstroke
Start just below the X-height. Make a compound curve that drops below the baseline. Then, make an upstroke that passes through the first stroke. Start at the baseline and finish at the X-height.

Uppercase Calligraphy Y
Underturn + descending loop
Start at the capital height. Make a large underturn, dropping below the X-height and rising again to the capital height. Then, shift into a clockwise descending loop, dropping down below the descender line, and finishing with a flourish, trailing rightward.

Lowercase Calligraphy y
Underturn + descending loop
Start at the X-height and make an underturn, dropping down to the baseline and back up to the X-height. Shift into a descending loop that drops below the descender line and curls around clockwise, ending on the right with a flourish.

Uppercase Calligraphy Z
Overturn + overturn + descending loop
Begin at the X-height. Make an overturn that reaches up to the capital height and down to the midway point between baseline and X-height. Next, make another overturn, reaching up to the X-height. As you curve around clockwise, shift the stroke into a descending loop. Drop to the descender line and curl back up again, passing through the vertical stroke and ending on the right.

Lowercase Calligraphy z
Overturn + overturn + descending loop
Start about halfway between the baseline and X-height. Make an overturn that touches the X-height and drops back down to the baseline. Next, make another overturn, but only extend up about halfway to the X-height. As you curve around clockwise, shift into a descending loop. Dip well below the descender line, and finish with a flourish, trailing right.
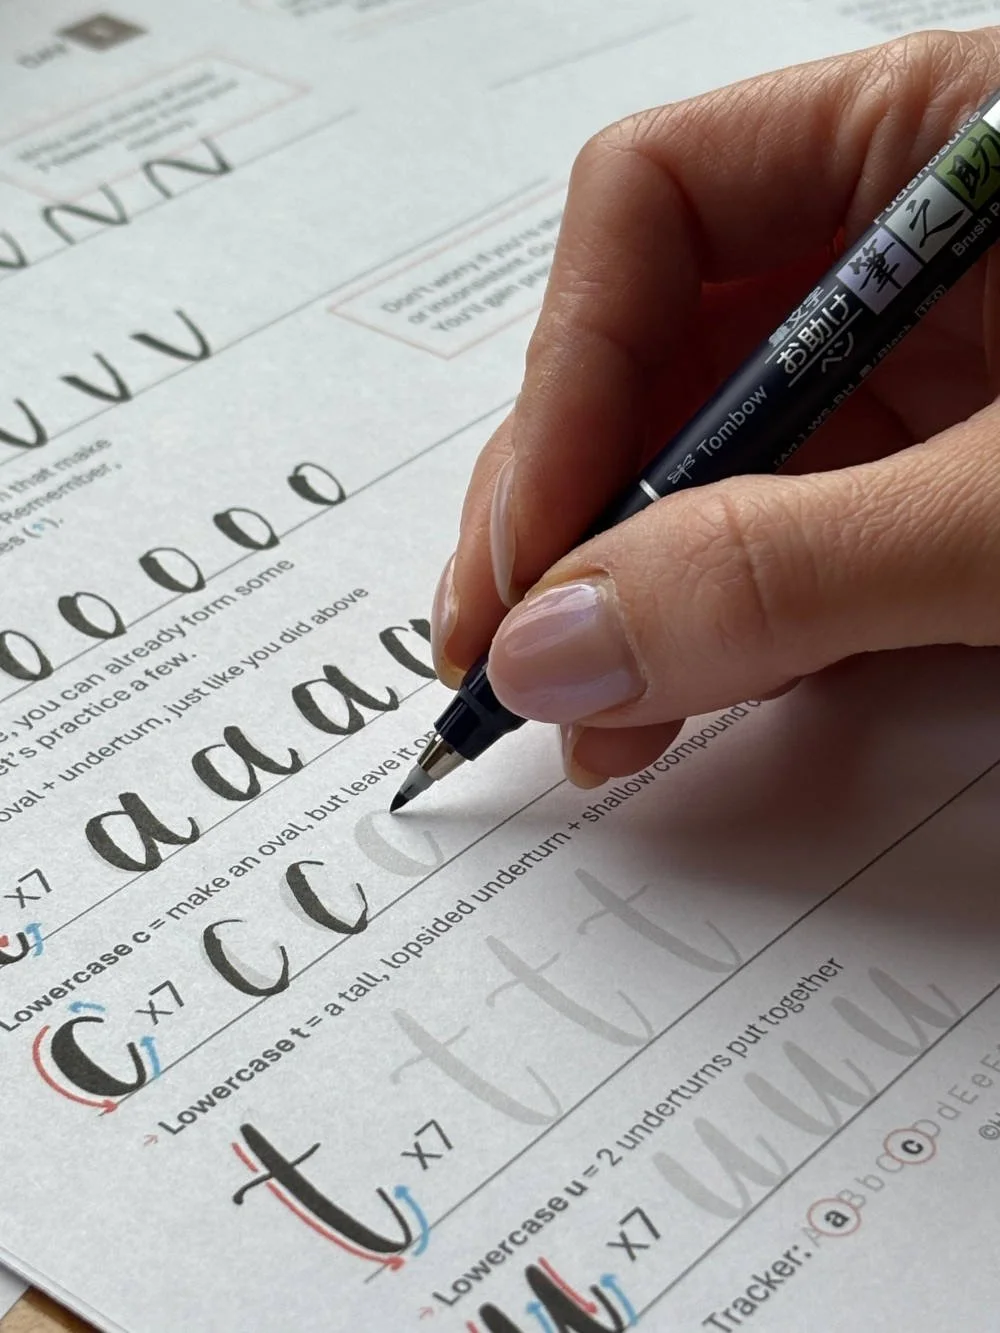
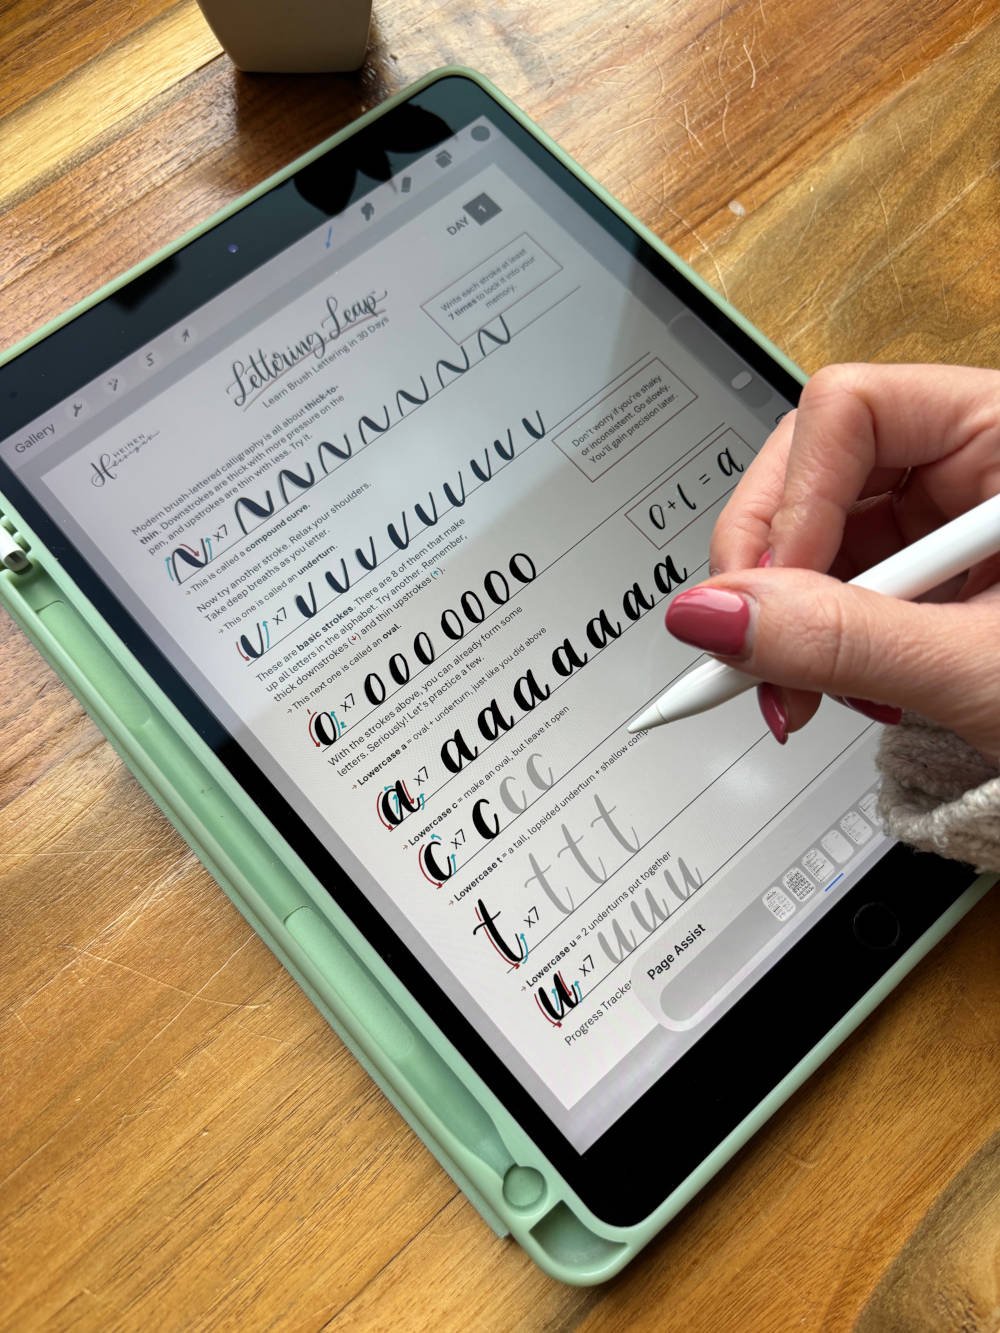
Repeated Practice is Key to Perfecting Your Calligraphy
It’s not enough to write your calligraphy letters once or twice. If you want to reach proficiency, you need to practice repeatedly. One of the best ways to do this is with practice worksheets.
Basically, what a practice sheet does is take the lettering diagrams above and arranges them on functional typography lines. You can then study the strokes of each letter, and trace the strokes several times across the paper under the guidance of the help lines.
The great thing about downloadable PDF worksheets is that you can use the file on your tablet for digital lettering, or print the pages out as many times as you want to truly master your skills.
Start with a few free practice sheets and then dive in with a full hand-lettering course or get some extra practice with full-alphabet practice sheets!
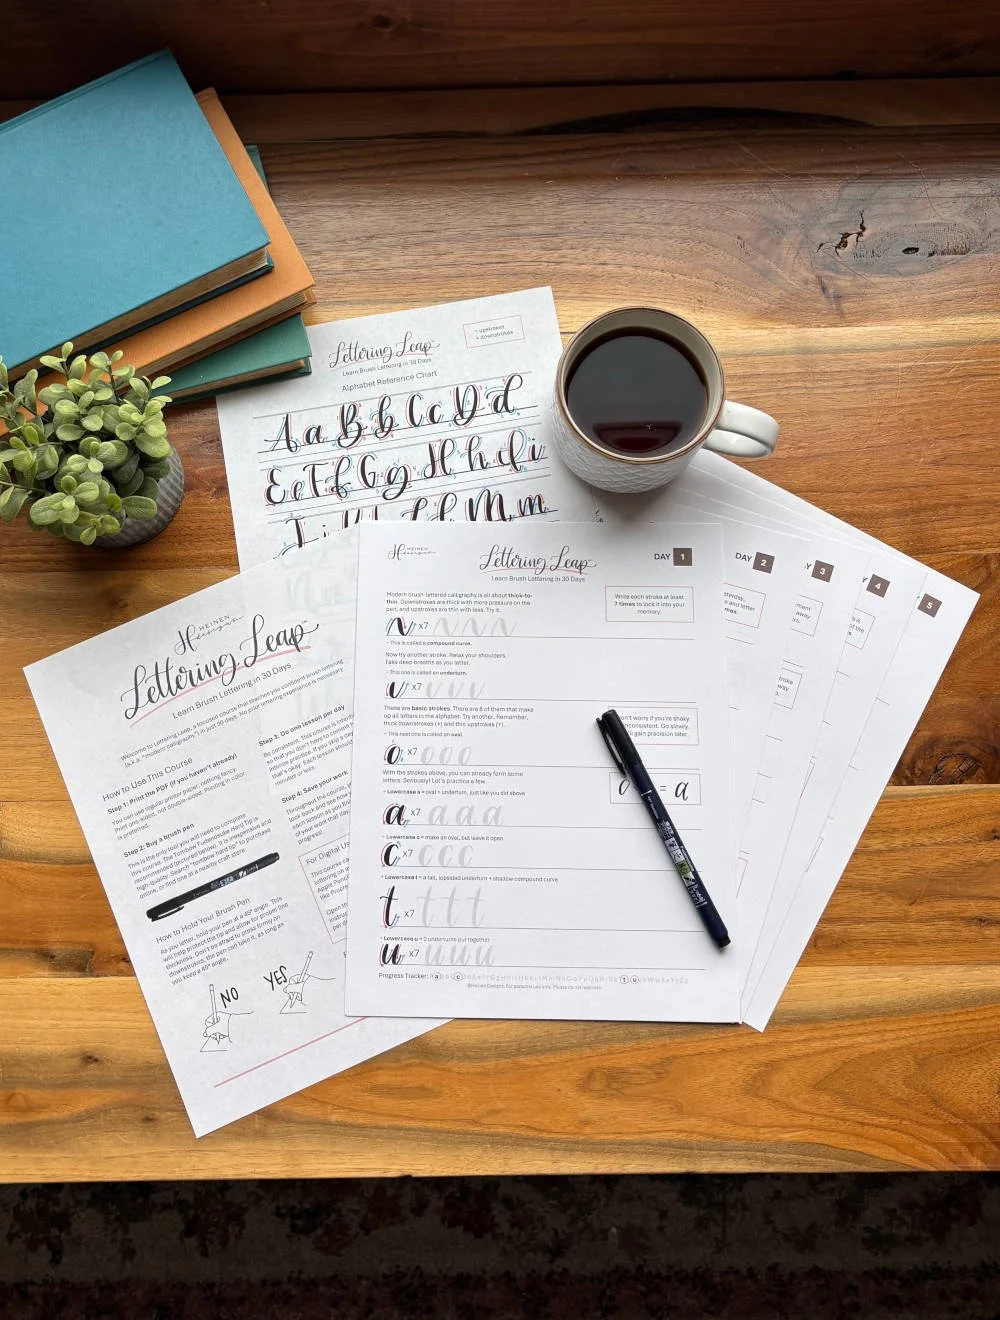
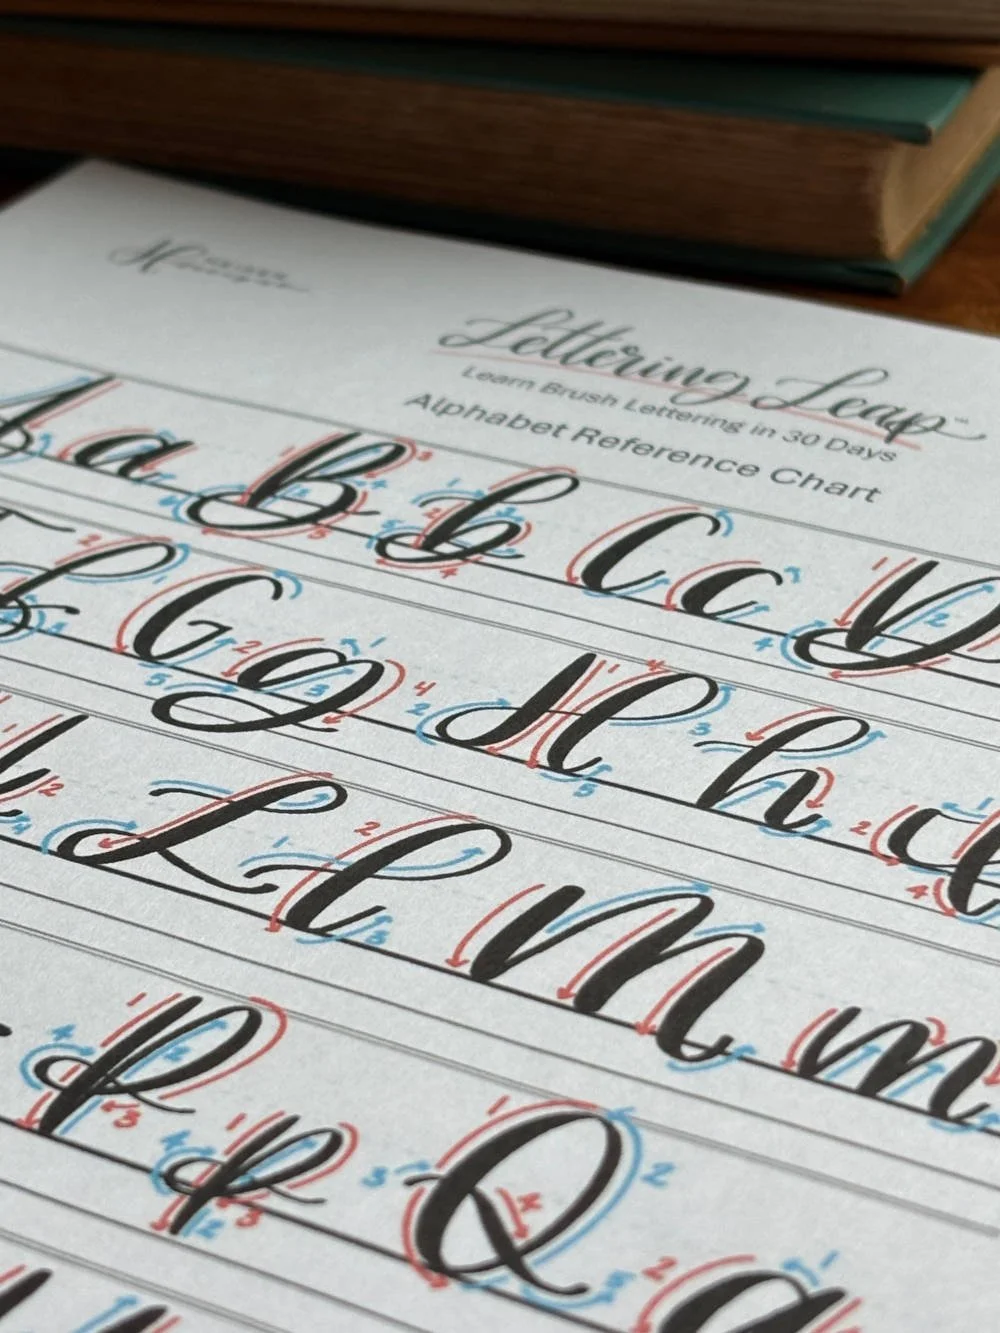
Lettering Leap™ is a downloadable course that teaches hand lettering through 30 short, structured lessons. It’s designed for beginners who want a clear, intentional path to learn lettering — without fluff or endless drills — just real modern calligraphy skills, built step by step in 30 days.
1 downloadable PDF (63 pages)
30 structured lessons, one per day
Each lesson takes 10 minutes or less
Printable or usable digitally (e.g. iPad apps like Procreate)
Download available immediately after purchase - additional copy sent via email
One-time purchase — no subscription needed
Digital product only (no physical item shipped)
Tombow Fudenosuke Hard Tip brush pen recommended (not included)
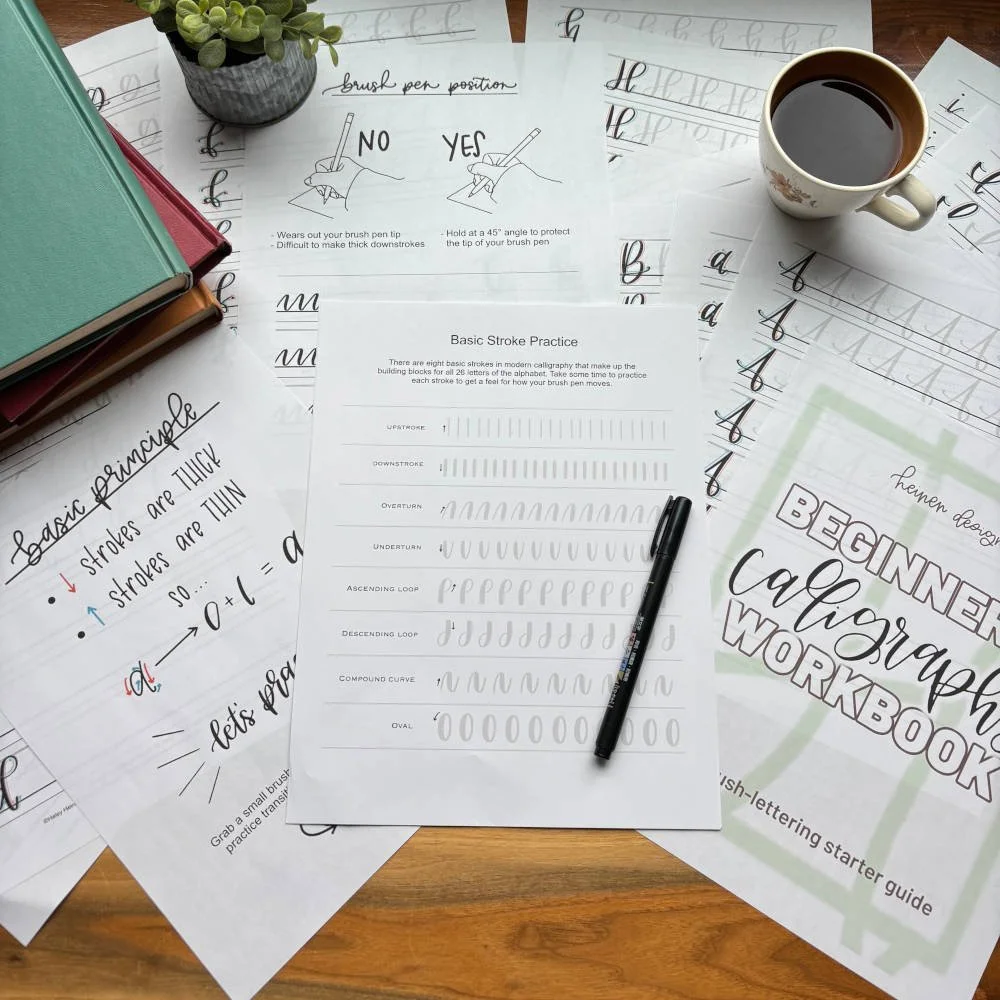
Start building real brush-lettering skills with focused, repetition-based practice designed to help your strokes stick. This workbook gives you the extra reps you need to reinforce technique, build consistency, and turn practice into progress.
57-page printable PDF with instant download access
Drill-style practice designed to build real skills and muscle memory
Beginner-friendly resource that helps you learn the right way from the start
Step-by-step tutorial for mastering the thick-to-thin brush lettering technique
Foundational basic strokes practice to set you up for success
52 dedicated tracing pages covering every letter of the alphabet
Includes both uppercase and lowercase brush lettering styles
Color-coded guide lines to reinforce proper stroke direction
Built-in guidelines for consistent letter proportions and spacing
Multiple rows of traceable letters plus open space for freehand practice
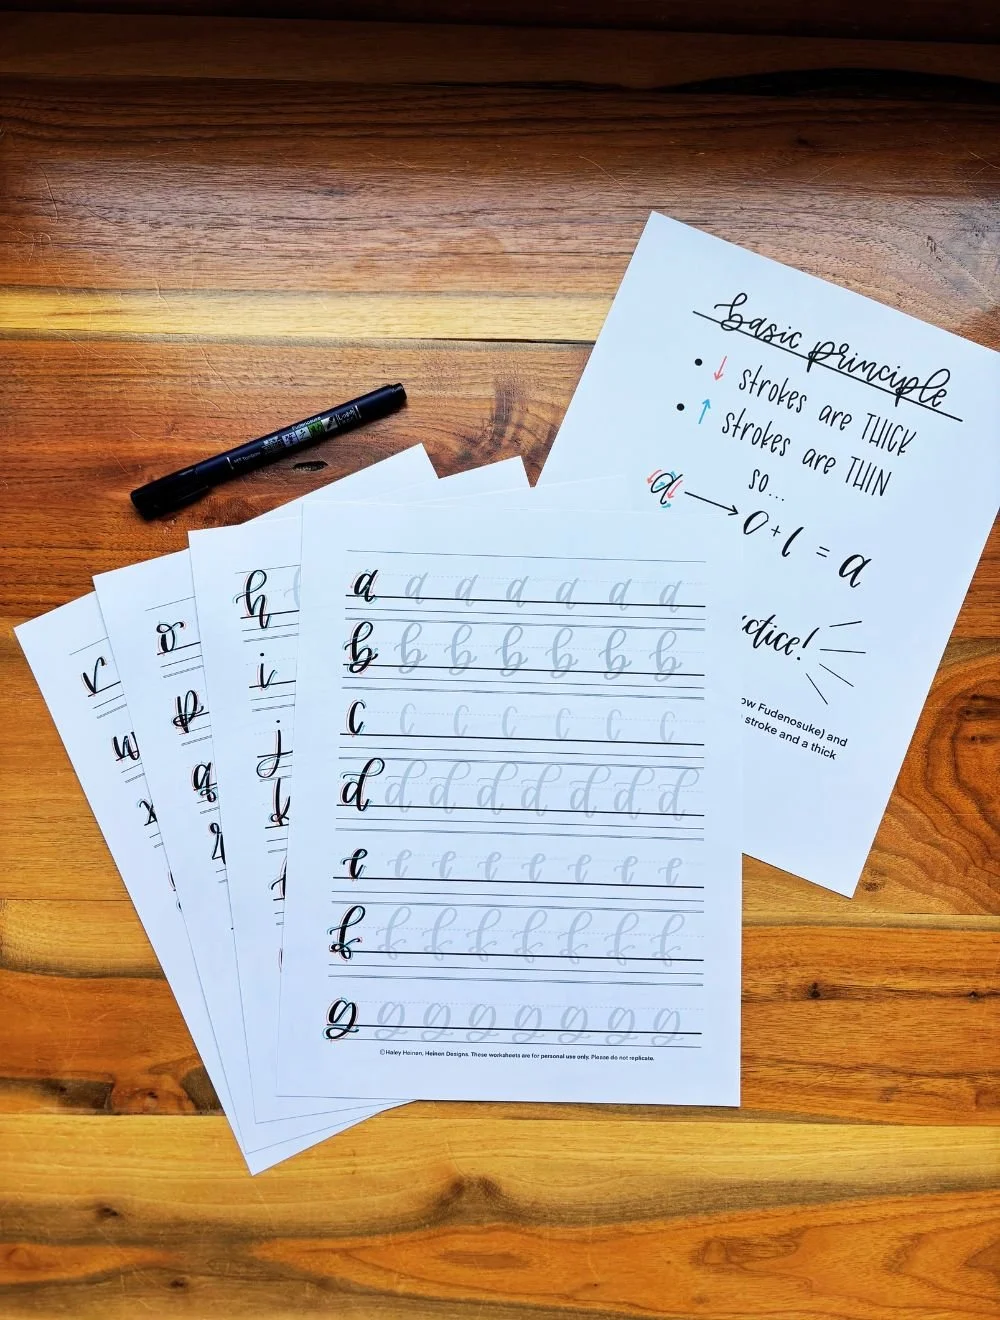
The Lowercase Lettering Worksheets PDF by Heinen Designs is a beginner’s guide to hand-lettering. It provides a step-by-step walkthrough of how to craft each letter in the beginner calligraphy alphabet. You can print off the pages or use them digitally on your tablet.
This is a digital download only. You will not be receiving any physical item.
Frequently Asked Questions about the Calligraphy Alphabet
What is modern calligraphy and how is it different from traditional calligraphy?
Modern calligraphy is a flexible and expressive style that often uses brush pens or flexible tips to create contrast between thick downstrokes and thin upstrokes. It differs from traditional calligraphy, which is generally more rigid and uses tools like dip pens or fountain pens with structured rules and consistent forms.What do “thick” and “thin” strokes mean in calligraphy?
In modern calligraphy, thick strokes are created when your pen moves downward with pressure, and thin strokes are from upward movements with light pressure. This contrast makes letters look more dynamic and elegant.How can I practice thick-to-thin strokes effectively?
Start with simple drills like repeating downward strokes (thick) and upward strokes (thin), then progress to compound curves and ovals. Practice sheets or traceable worksheets help build muscle memory.How long will it take to learn modern calligraphy?
Learning times vary, but with consistent daily practice (even 10–15 minutes), many beginners notice improvement in a few weeks. Mastery comes with continued practice, especially of the basic strokes and stroke control.Do I need expensive tools to start modern calligraphy?
No — beginners can start with a reasonably priced brush pen or flexible nib and quality paper. What matters most is learning pressure control and understanding stroke direction. Beginner-friendly tools often make progress easier.What are typography lines and why are they important?
Typography lines (baseline, x-height, cap line, ascender/descender lines) guide the size and placement of letters. They keep your letters consistent and balanced so your calligraphy looks intentional and professional.Why do uppercase and lowercase calligraphy letters look different?
Uppercase and lowercase letters have different shapes and heights — uppercase letters typically reach the capital height, while lowercase letters fit between the baseline and x-height. These differences affect how strokes are combined to form each letter.I can’t get smooth thick-to-thin transitions — what should I focus on?
Focus on pressure control: apply gentle, steady pressure for thick downstrokes, ease off pressure for thin upstrokes, and slow your movements to improve consistency. Practicing transitions between thick and thin strokes builds muscle memory.Why do some of my letters look uneven or shaky?
Uneven letters often come from rushing, inconsistent pressure, or skipping practice drills. Take your time, use guidelines, and repeat basic strokes until your hand feels more confident and fluid.Should I practice lowercase letters before uppercase letters?
Many calligraphers recommend starting with lowercase because they tend to be simpler and help you master basic strokes before moving on to more complex uppercase forms.Are there practice worksheets I can use to improve?
Yes! Downloadable calligraphy practice worksheets help you learn stroke shapes, spacing, and letterforms by tracing and repeating drills. They’re a great tool for both paper and digital lettering practice.